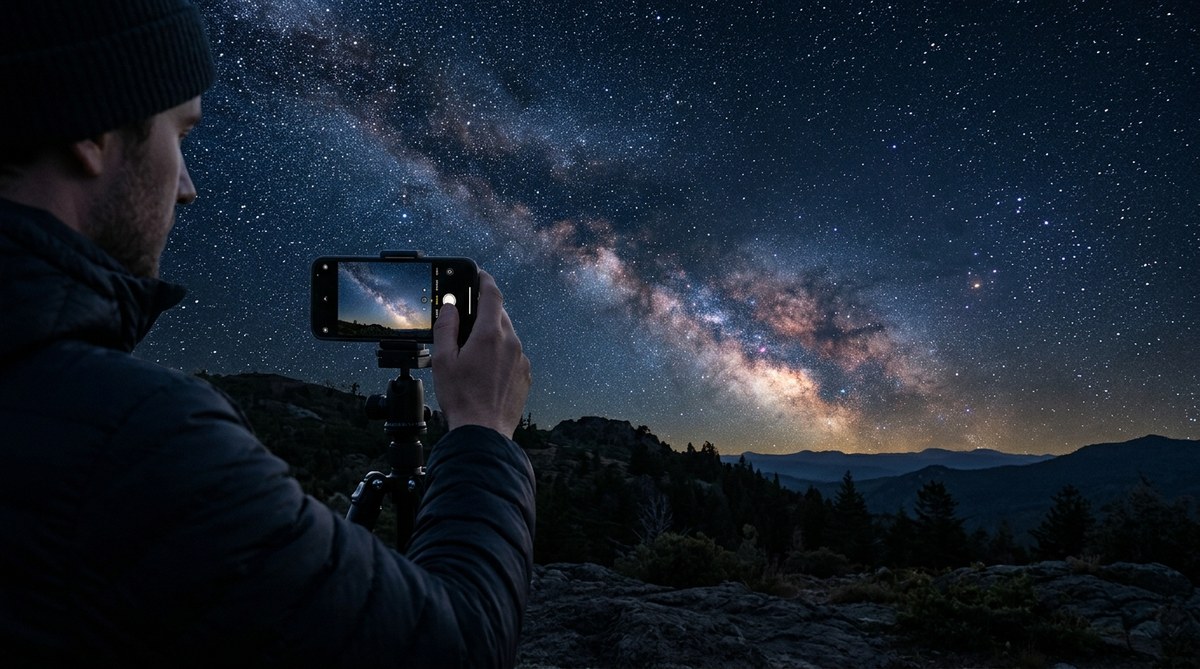
The night sky has never felt closer. The idea that a device sitting in your pocket can reveal the soft glow of the Milky Way seems almost magical. And yet, modern smartphone cameras have become so capable that pointing them upward after sunset now yields images that would have required a DSLR just a few years ago. You do not need expensive gear. You do not need a degree in astrophysics. What you need is a steady hand, a little patience, and a plan. In 2026, the gap between professional astrophotography and what you can achieve from your backyard has shrunk dramatically. Let us walk through exactly how to turn your smartphone into a night-sky camera.
Smartphone astrophotography is accessible to anyone with a modern phone, a tripod, and a dark sky. By using manual camera controls, stacking multiple exposures, and avoiding common mistakes like relying on digital zoom, you can capture detailed images of stars, planets, and even nebulae. Start with a calm night, a steady tripod, and our step-by-step guide to see immediate improvements in your night sky photos. (75 words)
Why Your Smartphone Camera Is Ready for the Stars
Most people assume they need a telescope or a mirrorless camera to photograph the cosmos. That assumption is outdated. Smartphone sensors have grown larger, and computational photography now does things that were once impossible. A phone like the latest iPhone or Google Pixel uses software to combine several exposures into a single clean image, canceling out noise and pulling in faint starlight. Even mid-range phones from 2024 and 2025 have a dedicated night mode that works for astrophotography. The trick is knowing how to trigger that mode and how to hold the phone steady.
The Gear You Actually Need
Before we get into technique, let us talk about hardware. You can start with almost nothing, but there are two items that will dramatically improve your results.
- A tripod: Even a cheap tabletop tripod eliminates handshake. For astrophotography, stability is everything. A tripod with a smartphone clamp costs under twenty dollars.
- A remote shutter or timer: Tapping the screen vibrates the phone. Use a two-second timer or a Bluetooth remote to avoid that shake.
- A dark location: Light pollution drowns out faint stars. Find a spot away from streetlights and city glow.
- Your phone’s Pro or Manual mode: Most phones let you adjust ISO, shutter speed, and focus. If your phone lacks this, try a third-party camera app.
If you are just starting, our guide on how to plan your first stargazing session in 2026 can help you pick the right night.
Step by Step: How to Photograph the Night Sky with a Smartphone
Follow these steps on your next clear evening. Do not rush. Each step builds on the last.
-
Set up your tripod on solid ground. Make sure the legs are fully extended and the center column is as low as possible to reduce wobble. Attach your phone with a clamp or a universal mount.
-
Open your camera app and switch to Manual (Pro) mode. If your phone does not have one, download an app like NightCap or Camera+ 2 that gives manual control.
-
Adjust the focus. Tap to focus on a bright star, then lock focus. On many phones, you can slide a focus slider to infinity. Do not rely on autofocus in the dark; it will hunt and fail.
-
Set the shutter speed. Start at 15 to 20 seconds. If you see star trails, shorten it. Use the “500 rule”: divide 500 by your lens’s full-frame equivalent focal length to get the maximum seconds before stars streak. For a typical phone with a 26mm equivalent lens, that is around 19 seconds.
-
Set the ISO. Begin at ISO 800 and increase to 1600 or 3200 depending on how dark your sky is. Higher ISO makes the image brighter but adds noise. Find the sweet spot.
-
Use a two-second delay or a remote shutter. This prevents vibration from your finger.
-
Take several shots at the same settings. You will combine them later using stacking software to reduce noise.
-
Review and adjust. Check the histogram. If it is too far to the left (underexposed), increase shutter speed or ISO. If it is clipped on the right (overexposed), reduce settings.
-
Repeat with different compositions. Include a foreground element like a tree or a silhouette to add depth.
Camera Settings Cheat Sheet
Here are the recommended starting points for common astrophotography targets:
| Target | Shutter Speed | ISO | Notes |
|---|---|---|---|
| Milky Way | 15-20 seconds | 1600-3200 | Requires very dark sky |
| Star trails | 30 seconds per shot (stack many) | 400-800 | Use intervalometer app |
| Moon (crescent) | 1/100 second | 100 | Lower ISO, faster shutter |
| Constellations | 10-15 seconds | 800-1600 | Include foreground for context |
| Planets (Jupiter/Saturn) | 1/30 to 1/2 second | 400-800 | Use digital zoom only if stable |
Common Mistakes Beginners Make (and How to Avoid Them)
| Mistake | Why It Happens | How to Fix |
|---|---|---|
| Blurry stars | Camera shake or wrong focus | Use a tripod, lock focus to infinity, use a timer |
| Star trails (unintended) | Shutter too long for lens | Follow the 500 rule; shorten exposure |
| Overexposed moon | Moon is bright, phone thinks it is dark | Lower ISO, use spot metering on the moon |
| No stars visible | ISO too low or sky too light-polluted | Increase ISO to 3200, move to darker location |
| Digital zoom creates noise | Zooming magnifies sensor noise | Do not zoom; crop later in editing |
Advanced Techniques to Try
Once you have the basics down, you can push further. One of the most rewarding methods is image stacking. You take around 10 to 20 identical frames and combine them in free software like Sequator or DeepSkyStacker. The result is a cleaner, more detailed image than any single shot.
“The single biggest upgrade you can make after buying a tripod is learning to stack images. It cuts noise so effectively that you will see stars that were invisible in the individual frames.” — A veteran astrophotographer from the Thrush Observatory community.
Another technique is shooting star trails. Set your phone to take continuous 30-second exposures for an hour using an intervalometer app. Then combine them into a single image or a time-lapse video. The circles of stars around Polaris make a stunning photo.
If you want to capture the International Space Station as it passes overhead, our article on how to spot the International Space Station in your night sky includes timing and camera settings.
Post-Processing Your Night Sky Photos
Even the best raw smart phone images benefit from a little editing. You do not need Photoshop. Free apps like Snapseed or Adobe Lightroom Mobile can handle the job.
- Increase contrast to make stars pop.
- Slightly boost clarity or texture to define the Milky Way.
- Reduce highlights if the moon or a planet is too bright.
- Use selective adjustments to darken the sky further without losing the stars.
Be careful not to overdo it. A natural look is usually more impressive than a heavy-handed edit.
Combining Smartphone and Telescope
If you own a small telescope, you can hold your phone’s camera up to the eyepiece to capture the moon, Jupiter’s moons, or Saturn’s rings. A dedicated phone adapter makes this much easier. The same tripod and remote shutter rules apply, but focus through the telescope eyepiece first. The results can be surprising for a $30 adapter. Beginners often try this after reading about how to choose the perfect beginner telescope for your first night sky adventure.
What to Expect on Your First Night
Your first attempt might yield a few dim smudges on a black background. That is normal. The learning curve is gentle, but it is still a curve. Pay attention to the sky conditions. A moonless night away from city lights is worth a two-hour drive if the forecast is clear.
Check out the 6 easy constellations to find tonight with just your eyes to help you aim your phone in the right direction. Once you frame Orion or the Big Dipper correctly, the camera will do the rest.
Turning Your Photos into a Hobby
Smartphone astrophotography is not a cheap trick. It is a genuine entry point into a lifelong passion. Many people who start by taking a picture of the moon with their phone end up buying a telescope a year later. And that is fine. But you can also stay purely with your phone and still produce images that impress friends and family.
If you want to learn more about what you are seeing, our understanding the night sky: a beginner’s guide to astronomy fundamentals explains the science behind the dots you capture.
The Joy of Sharing Your Results
Do not keep those photos to yourself. Post them on social media, share them in astronomy forums, and compare notes with other hobbyists. The community is friendly and eager to help. You will quickly find that the most common question you get is: “How did you take that with a phone?”
Every time you answer, you inspire someone else to look up.
Your First Night under the Stars
The barrier to entry for astrophotography has never been lower. Grab your phone, screw it onto a tripod, and step outside. Start with the moon or the brightest stars. Adjust your settings. Take ten frames instead of one. Edit lightly. And then look at the result. You will see a sky that you knew was there but never thought you could capture.
The stars are waiting. Your phone is ready. Tonight is the night.